Showing posts with label neutral. Show all posts

Monday, October 17, 2011

EOTD/Tutorial/Swatches: Sleek Au Naturel eye shadow palette (from the Nude collection)

Hey everyone!

Today I have another EOTD for you with step by step pictures, but first I'm going to start off with pictures and swatches of the Au Naturel palette from Sleek. This palette came out with the Nude collection. It has a good selection of neutral colours, great for light daytime looks or darker looks for a night out. Three of the colours have a frost finish, one has a more satin finish, the others are matte.

Here are some pictures of the palette.

SONY DSC
SONY DSC


The colours swatched over concealer (MAC Select Cover-up in NW20)

SONY DSC
SONY DSC


On to the tutorial!

I started of by priming my eye with MAC Paint Pot in Nubile (this came out recently with the Posh Paradise collection, swatches coming soon!)
I filled in my brow mixing Nubuck and Bark and used Nougat with a flat shader brush as a brow bone highlight.

SONY DSC

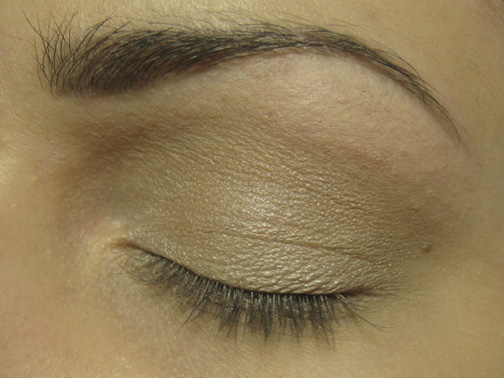
Next, I applied Taupe all over the lid and in the inner corner with a flat shader brush.

SONY DSC

To define the crease and add some shading, I mixed Cappuccino and Bark and applied in the crease with a blending brush. Then I darkened up the crease and defined it even more using a crease brush with Mineral earth right in the crease and outer corner.

SONY DSC


With the same crease brush, I used Noir in the outer corner.

SONY DSC


On the bottom lash line I applied Conker with a pencil brush. On the bottom waterline I used a skin coloured eyeliner (Isa Dora Inliner Kajal in 56 Blonde).

SONY DSC

I added MAC's Blacktrack fluidline to the top lash line.

SONY DSC


Then applied mascara, Max Factor False Lash Effect, to the top and bottom lashes.

SONY DSC

You could leave it like this, but I wanted to add some extra drama so I applied Ardell's Demi Wispies.

SONY DSCSONY DSCSONY DSC


And that's how I created this look. I hope you like it!
If you want to know more about the brushes I use and which are my favorites, click here.


I purchased this palette from Boozyshop for €8.50. You can also order it from the Sleek website for €9 or £6.49


Thanks for stopping by!


Up next: MAC Posh Paradise haul;


x
Tanja

Friday, August 19, 2011

EOTD: Sleek Makeup - Oh So Special palette

Hiya!

I have another EOTD for you all today! For this look I used the Oh So Special palette from Sleek Makeup. This palette was added to their permanent line not too long ago. I bought it together with the Curaçao palette. I did a look with that palette here, and if you want to see my post on both palettes click here.

Sleek products can be purchased at SleekMakeup.com, or if you live close to the Netherlands, check out these online stores: Boozyshop.nl, Enchantra.eu, or Alicejohavesentials.nl.

On to the EOTD:

SONY DSC

The Oh So Special palette:


Products used:

- MAC Brun: to fill in my brows, with an angled bush (MAC 263).

- NYX Jumbo pencil in Milk: applied on the lid all the way up to the brow with my finger

- Sleek Bow: on the entire lid and inner corner and as a brow highlight, with a flat shader brush (MAC 239).

- Sleek The Mail: applied in the crease to make it easier to blend the darker colours, with a blending brush (MAC 217)

- Sleek Gift Basket: applied on the lid  with a flat shader brush (MAC 239)

- MAC Naked Lunch: in the inner corner, with a pencil brush (MAC 219)

- Sleek Boxed and Celebrate: mixed both and applied in the crease with a blending brush (MAC 217)

- Sleek Celebrate: to darken up the crease and outer corner, also applied on the lower lashline with a pencil brush (MAC 219)

- Sleek Noir: used with an angled brush (MAC 266) to line top and bottom lashline softly.

- Urban Decay 24/7 eyeliner in Zero: to line lower waterline.

- False lashes from Claire's, with DUO Lash adhesive.

- Max Factor False Lash Effect mascara: few coats on the top lashes, one coat on bottom lashes.


Some more pictures:

SONY DSC  
SONY DSC
SONY DSC

This palette is really nice if you like neutral colours. I like that it has matte and shimmery colours!

Thank you for stopping by!

Up next: one of my favorite blogs for inspiration.

x
Tanja

Tuesday, July 26, 2011

Review: Sleek Oh So Special and Curaçao I-Divine Palettes

Hello folks!


Sleek makeup recently came out with a new collection: The Caribbean collection. The collection consists of an eyeshadow palette, a blush and a tinted lipbalm. I only picked up the eyeshadow palette. After I bought their Storm palette when I was in London, I started collecting their palettes. I think the quality of the eyeshadows is amazing for the prize (around £7 or €9 or $12).


This palette from the Caribbean collection is called "Curaçao" and is filled with bright and fun colours.
Lets have a look:

Sleek Curaçao palette (click for larger view)


Like all the Sleek palettes, these eyeshadows are nicely pigmented. The matte shadows are usually a little less pigmented than the shimmery/metalic ones. The darker matte colours usually show up better I find. Over a base or primer they work great though.


I swatched each row on bare skin and over Urban Decay's Primer potion.


Top row, bare skin, flash


Top row, over UDPP, flash


Bottom row, bare skin, flash


Bottom row, over UDPP, flash


My favorites of this palette are Green Iguana, Purple Haze, Green Martini and Singapore Sling.
Not all the palettes I have from Sleek have names for the colours but I'm glad all these new palettes do.


Sleek also came out with another palette, with more neutral colours, which is called "Oh So Special". I believe this is part of their permanent line since it isn't part of a collection.
This palette has got some great shadows to create any kind of neutral look with. It has some matte and some shimmery colours, going from really light to black so you could do an every day eye look with this but also a really dark smokey eye. If you can't get your hands on the Urban Decay Naked palette or it's too expensive, definitely check out this palette!

Sleek Oh So Special palette (click for larger view)


Here are the swatches, with and without primer.

Top row, bare skin, flash


Top row, over UDPP, fash


Bottom row, bare skin, flash


Bottom row, over UDPP, flash


My favorites: Glitz, Celebrate, Boxed and Wrapped Up.
I'm not too crazy about the matte pinks in this palette. Not as eyeshadows anyway, but I've found they work nicely as blushes.
I love how pigmented the matte black (Noir) that comes with a lot of these palettes is. I won't have to buy a matte black in a looong time, haha.


I'll probably do some eye looks with these palettes in the future, so look out for that!


x
Tanja

Wednesday, August 18, 2010

Tutorial: Soft neutral look

For my second tutorial I went for a soft eye, using neutral colours. This will look great on anyone with any skin tone or eye colour.

Last time I forgot to mention what I use for my brows and brow highlight.
I pretty much every day use Brun from MAC to fill in my brows and Vanilla, also from MAC, as my brow highlight.

So here's the tutorial:


Brun...


...with a big angled brush from The Body shop (got this on years ago)


and Vanilla...


... with a flat shader brush, SS 239 from Sigma (this one is a little bigger and fluffier than the MAC 239, which makes it perfect for my brow highlight)


Next, Soft Ochre paintpot from MAC (or any other eye shadow base you like) 


 For this look, I used the NYX eye shadow palette called Versus. I used number 2, 3, 4 and 10.


 First, I put number 3 all over the lid and lower lash line with a flat shader brush (MAC 239)


 Then, using the SS 226, I put number 2 in the crease.


I also applied it on the outer half of my lower lash line using the 239. 


 I then lined my upper lash line with a black pencil. (You can use any black pencil you like)


 And smudged it with a pencil brush. I used the MAC 219.


 To darken the outer corner a bit I used number 4 with the SS 226 and connected it to the lower lash line with the 219.
 (doesnt really show up in the picture) It also helps blend the black eyeliner.


Next is a white eye pencil for the waterline and I put number 10 from the palette in the inner corner.


Lots of mascara. I used MaxFactor Masterpiece again.


And you're done!


And you're done! Hope you like it.
Requests for future tutorials are always welcome!


x
Tanja

Monday, August 9, 2010

Makeover: Michelle

I love doing makeup on myself, but i also like playing around with makeup with friends.
So here's a look I did for a friend. I don't remeber what products I used, but I'll definitely will be taking note of that in the future.
I did a neutral look with eyeliner and false lashes.

Before:


After:


And I did a dark purple smokey eye for fun.


Again, the quality of the pictures isn't great but I'll be working on that when I take new pictures.


x
Tanja