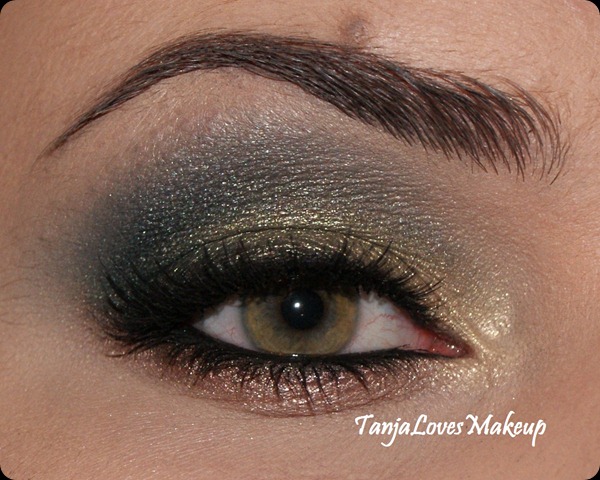
Hey hey!
Time for another EOTD!
Products used:
- MAC Select cover up concealer in NW20
- Catrice Brow Kit to fill in my brows
- MAC Blanc Type on the browbone
- MAC Wedge to blend out the crease
- MAC Idyllic paintpot (LE) on the lid as a base
- MAC Reflects Blackened Red on the lid
- MAC Embark in the crease
- Urban Decay Half Baked on the inner corner
- MAC Wedge and Embark on the lower lashline
- MAC Blacktrack fluidline on top and bottom waterline
- Covergirl Lashblast Mascara
- Red Cherry lashes #415
Thanks for stopping by!
x
Tanja
A blog about everything related to makeup and nails, such as tutorials, reviews, hauls, eye of the day (EOTD), nail of the day (NOTD), favorites,...
Showing posts with label EOTD. Show all posts
Thursday, September 27, 2012
Tuesday, September 25, 2012
EOTD: Green smokey eye with a hint of purple
Hey everyone!
Just a quick EOTD for today!
Products used:
- MAC Select cover up concealer in NW20
- Catrice Brow Kit to fill in my brows
- MAC Blanc Type on the browbone
- MAC Wedge to blend out the crease
- MAC Bows & Curtseys (LE*) on the lid and lower lashline
- Inglot 418 in the crease
- MAC Fresh Approach (LE) on the top inner corner
- Inglot 441 and 439 on the bottom inner corner
- MAC Blacktrack fluidline on top and bottom waterline
- Covergirl Lashblast Mascara
- Ardell Demi Wispies
Until next time!
x
Tanja
Quick question: Do you prefer large pictures like these, or slightly smaller ones?
* LE = Limited Edition
Just a quick EOTD for today!
Products used:
- MAC Select cover up concealer in NW20
- Catrice Brow Kit to fill in my brows
- MAC Blanc Type on the browbone
- MAC Wedge to blend out the crease
- MAC Bows & Curtseys (LE*) on the lid and lower lashline
- Inglot 418 in the crease
- MAC Fresh Approach (LE) on the top inner corner
- Inglot 441 and 439 on the bottom inner corner
- MAC Blacktrack fluidline on top and bottom waterline
- Covergirl Lashblast Mascara
- Ardell Demi Wispies
Until next time!
x
Tanja
Quick question: Do you prefer large pictures like these, or slightly smaller ones?
* LE = Limited Edition
Posted by
Tanja
at
3:09:00 AM
Sunday, October 23, 2011
EOTD/swatches: Green and red look with the Sleek PPQ Me, Myself & Eye palette
Hiya!
It's time for another EOTD! This time I used the PPQ, Me, Myself & Eye palette from Sleek (can you tell I love Sleek palettes?)
Swatches of the first row (over MAC Face and Body N2):
Swatches of the second row:

And here's the look I came up with!
Products used:
- MAC Vanilla: applied with a flat shader brush as a brow bone highlight.
- Sleek Supernova: to fill in my brows softly with an angled brush.
- Sleek Golden Silvers: as an inner corner highlight, applied with a pencil brush.
- Sleek Chris The Burgundy: on the lower lash line, slightly winged out, applied with a pencil brush.
- Sleek Blue Monday: applied all over the upper lid with a flat shader brush.
- Sleek Primal Green: used in the crease with a blending brush.
- Sleek Black Box: applied with a pencil brush in the outer corner and smudged along the lash line.
- MAC Blacktrack fluidline: used on the top and bottom water line with an angled brush.
- Max Factor False Lash Effect: couple coats of mascara on the top lashes, one coat on the bottom lashes.
- Ardell Demi Wispies: I added lashes with Duo lash adhesive.
I didn't know which colours to use when I started doing this look, but I like how it turned out! I like how the red on the bottom brings out my green eyes. I think this is a really nice way to make red eyeshadow wearable.
I bought this palette from Boozyshop but it's sold out there. It is still available on the Sleek makeup website for £6.49 or €9.
Hope you like it and thank you for stopping by!
Up next: different parts of the eye - an eye chart.
x
Tanja
It's time for another EOTD! This time I used the PPQ, Me, Myself & Eye palette from Sleek (can you tell I love Sleek palettes?)
Swatches of the first row (over MAC Face and Body N2):
Swatches of the second row:
And here's the look I came up with!
Products used:
- MAC Vanilla: applied with a flat shader brush as a brow bone highlight.
- Sleek Supernova: to fill in my brows softly with an angled brush.
- Sleek Golden Silvers: as an inner corner highlight, applied with a pencil brush.
- Sleek Chris The Burgundy: on the lower lash line, slightly winged out, applied with a pencil brush.
- Sleek Blue Monday: applied all over the upper lid with a flat shader brush.
- Sleek Primal Green: used in the crease with a blending brush.
- Sleek Black Box: applied with a pencil brush in the outer corner and smudged along the lash line.
- MAC Blacktrack fluidline: used on the top and bottom water line with an angled brush.
- Max Factor False Lash Effect: couple coats of mascara on the top lashes, one coat on the bottom lashes.
- Ardell Demi Wispies: I added lashes with Duo lash adhesive.
I didn't know which colours to use when I started doing this look, but I like how it turned out! I like how the red on the bottom brings out my green eyes. I think this is a really nice way to make red eyeshadow wearable.
I bought this palette from Boozyshop but it's sold out there. It is still available on the Sleek makeup website for £6.49 or €9.
Hope you like it and thank you for stopping by!
Up next: different parts of the eye - an eye chart.
x
Tanja
Posted by
Tanja
at
6:29:00 PM
Monday, October 17, 2011
EOTD/Tutorial/Swatches: Sleek Au Naturel eye shadow palette (from the Nude collection)
Hey everyone!
Today I have another EOTD for you with step by step pictures, but first I'm going to start off with pictures and swatches of the Au Naturel palette from Sleek. This palette came out with the Nude collection. It has a good selection of neutral colours, great for light daytime looks or darker looks for a night out. Three of the colours have a frost finish, one has a more satin finish, the others are matte.
Here are some pictures of the palette.

The colours swatched over concealer (MAC Select Cover-up in NW20)
On to the tutorial!
I started of by priming my eye with MAC Paint Pot in Nubile (this came out recently with the Posh Paradise collection, swatches coming soon!)
I filled in my brow mixing Nubuck and Bark and used Nougat with a flat shader brush as a brow bone highlight.
Next, I applied Taupe all over the lid and in the inner corner with a flat shader brush.
To define the crease and add some shading, I mixed Cappuccino and Bark and applied in the crease with a blending brush. Then I darkened up the crease and defined it even more using a crease brush with Mineral earth right in the crease and outer corner.
With the same crease brush, I used Noir in the outer corner.
On the bottom lash line I applied Conker with a pencil brush. On the bottom waterline I used a skin coloured eyeliner (Isa Dora Inliner Kajal in 56 Blonde).
I added MAC's Blacktrack fluidline to the top lash line.
Then applied mascara, Max Factor False Lash Effect, to the top and bottom lashes.
You could leave it like this, but I wanted to add some extra drama so I applied Ardell's Demi Wispies.


And that's how I created this look. I hope you like it!
If you want to know more about the brushes I use and which are my favorites, click here.
I purchased this palette from Boozyshop for €8.50. You can also order it from the Sleek website for €9 or £6.49
Thanks for stopping by!
Up next: MAC Posh Paradise haul;
x
Tanja
Today I have another EOTD for you with step by step pictures, but first I'm going to start off with pictures and swatches of the Au Naturel palette from Sleek. This palette came out with the Nude collection. It has a good selection of neutral colours, great for light daytime looks or darker looks for a night out. Three of the colours have a frost finish, one has a more satin finish, the others are matte.
Here are some pictures of the palette.
The colours swatched over concealer (MAC Select Cover-up in NW20)
On to the tutorial!
I started of by priming my eye with MAC Paint Pot in Nubile (this came out recently with the Posh Paradise collection, swatches coming soon!)
I filled in my brow mixing Nubuck and Bark and used Nougat with a flat shader brush as a brow bone highlight.
Next, I applied Taupe all over the lid and in the inner corner with a flat shader brush.
To define the crease and add some shading, I mixed Cappuccino and Bark and applied in the crease with a blending brush. Then I darkened up the crease and defined it even more using a crease brush with Mineral earth right in the crease and outer corner.
With the same crease brush, I used Noir in the outer corner.
On the bottom lash line I applied Conker with a pencil brush. On the bottom waterline I used a skin coloured eyeliner (Isa Dora Inliner Kajal in 56 Blonde).
I added MAC's Blacktrack fluidline to the top lash line.
Then applied mascara, Max Factor False Lash Effect, to the top and bottom lashes.
You could leave it like this, but I wanted to add some extra drama so I applied Ardell's Demi Wispies.
And that's how I created this look. I hope you like it!
If you want to know more about the brushes I use and which are my favorites, click here.
I purchased this palette from Boozyshop for €8.50. You can also order it from the Sleek website for €9 or £6.49
Thanks for stopping by!
Up next: MAC Posh Paradise haul;
x
Tanja
Posted by
Tanja
at
7:19:00 PM
Monday, October 10, 2011
EOTD: Fall eye look using the Sleek Original palette!
Hiya!
Today's EOTD was kind of inspired by fall colours and I used the Sleek Original palette to create it.
Here's a picture of the palette. I love these colours!
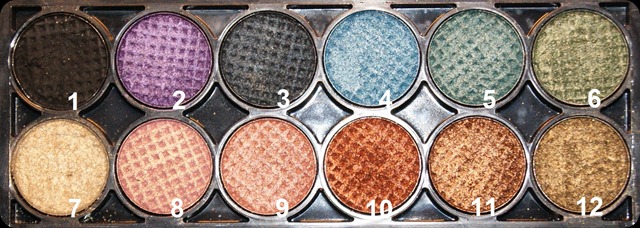
Since these eyeshadows don't have names, I gave them numbers so it's easier for me to refer to which colour I used.
Here's how I did this look:
Today's EOTD was kind of inspired by fall colours and I used the Sleek Original palette to create it.
Here's a picture of the palette. I love these colours!
Since these eyeshadows don't have names, I gave them numbers so it's easier for me to refer to which colour I used.
Here's how I did this look:
- MAC Brun: to fill in my brows, with an angled bush.
- MAC Painterly paintpot: applied on the lid all the way up to the brow with my finger.
- MAC Vanilla eyeshadow: as a brow highlight, applied with a flat shader brush.
- Sleek 7: in the inner corner and inner third of the top and bottom lid, with a pencil brush
- Sleek 12: applied on middle of the upper the lid with a flat shader brush
- Sleek 6: with the same brush on the outer third of the lid.
- Sleek 3: blended in the crease with a small crease brush
- Sleek 9: applied in the middle of the lower lashliner with a pencil brush.
- Sleek 10: with the same brush, applied to the outer third of the lower lashline.
- Sleek 1: smudged in between top and bottom lashes with a pencil brush.
- MAC Blacktrack fluidline: applied on top and bottom waterline with an angled brush.
- Max Factor False Lash Effect: a couple coats on the top lashes, 1 coat on the bottom lashes.
- Lashes from Claire's applied with DUO Lash adhesive.
A couple more pictures:
This look is pretty easy to do. All you have to do is make sure you blend the colours together really well.
Hope you liked this look. Let me know what you think!
Up next: CND Shellac review + my first professional manicure.
x
Tanja
Posted by
Tanja
at
5:00:00 PM
Sunday, August 21, 2011
Favorites: Makeup artist and beauty blogger, Linda Hallberg
Hello hello!
Today’s post is about one of my favorite blogs to look at when I need inspiration or when I just want tolook at beautiful makeup looks. The blog I’m talking about is the one from Linda Hallberg.

I love this girl, she’s gorgeous! I love the looks she does and the way she does her makeup. She’s a 24 year old Swedish hair and makeup artist who works for Make Up Store.
She posts EOTD’s mostly and I love them for inspiration. She loves to use colours and knows how to combine them. She also writes about products she likes, clients she worked on, personal stuff,… She writes in Swedish, but I always use Google translate so I know what she’s talking about.
I’ll show you some of my favorite looks by her!
Some colourful looks:


Smokey eyes:
Creative looks:

She does neutral looks too :) :
And she’s great with hair as well!:

So do you like her looks? Did you already know Linda Hallberg?
Definitely go check out her blog if you didn’t!!
Up next: a sparkly NOTD!
x
Tanja
Today’s post is about one of my favorite blogs to look at when I need inspiration or when I just want tolook at beautiful makeup looks. The blog I’m talking about is the one from Linda Hallberg.
I love this girl, she’s gorgeous! I love the looks she does and the way she does her makeup. She’s a 24 year old Swedish hair and makeup artist who works for Make Up Store.
She posts EOTD’s mostly and I love them for inspiration. She loves to use colours and knows how to combine them. She also writes about products she likes, clients she worked on, personal stuff,… She writes in Swedish, but I always use Google translate so I know what she’s talking about.
I’ll show you some of my favorite looks by her!
Some colourful looks:
Smokey eyes:
Creative looks:
She does neutral looks too :) :
And she’s great with hair as well!:
So do you like her looks? Did you already know Linda Hallberg?
Definitely go check out her blog if you didn’t!!
Up next: a sparkly NOTD!
x
Tanja
Friday, August 19, 2011
EOTD: Sleek Makeup - Oh So Special palette
Hiya!
I have another EOTD for you all today! For this look I used the Oh So Special palette from Sleek Makeup. This palette was added to their permanent line not too long ago. I bought it together with the Curaçao palette. I did a look with that palette here, and if you want to see my post on both palettes click here.
Sleek products can be purchased at SleekMakeup.com, or if you live close to the Netherlands, check out these online stores: Boozyshop.nl, Enchantra.eu, or Alicejohavesentials.nl.
On to the EOTD:
The Oh So Special palette:
Products used:
- MAC Brun: to fill in my brows, with an angled bush (MAC 263).
- NYX Jumbo pencil in Milk: applied on the lid all the way up to the brow with my finger
- Sleek Bow: on the entire lid and inner corner and as a brow highlight, with a flat shader brush (MAC 239).
- Sleek The Mail: applied in the crease to make it easier to blend the darker colours, with a blending brush (MAC 217)
- Sleek Gift Basket: applied on the lid with a flat shader brush (MAC 239)
- MAC Naked Lunch: in the inner corner, with a pencil brush (MAC 219)
- Sleek Boxed and Celebrate: mixed both and applied in the crease with a blending brush (MAC 217)
- Sleek Celebrate: to darken up the crease and outer corner, also applied on the lower lashline with a pencil brush (MAC 219)
- Sleek Noir: used with an angled brush (MAC 266) to line top and bottom lashline softly.
- Urban Decay 24/7 eyeliner in Zero: to line lower waterline.
- False lashes from Claire's, with DUO Lash adhesive.
- Max Factor False Lash Effect mascara: few coats on the top lashes, one coat on bottom lashes.
Some more pictures:


This palette is really nice if you like neutral colours. I like that it has matte and shimmery colours!
Thank you for stopping by!
Up next: one of my favorite blogs for inspiration.
x
Tanja
I have another EOTD for you all today! For this look I used the Oh So Special palette from Sleek Makeup. This palette was added to their permanent line not too long ago. I bought it together with the Curaçao palette. I did a look with that palette here, and if you want to see my post on both palettes click here.
Sleek products can be purchased at SleekMakeup.com, or if you live close to the Netherlands, check out these online stores: Boozyshop.nl, Enchantra.eu, or Alicejohavesentials.nl.
On to the EOTD:
The Oh So Special palette:
Products used:
- MAC Brun: to fill in my brows, with an angled bush (MAC 263).
- NYX Jumbo pencil in Milk: applied on the lid all the way up to the brow with my finger
- Sleek Bow: on the entire lid and inner corner and as a brow highlight, with a flat shader brush (MAC 239).
- Sleek The Mail: applied in the crease to make it easier to blend the darker colours, with a blending brush (MAC 217)
- Sleek Gift Basket: applied on the lid with a flat shader brush (MAC 239)
- MAC Naked Lunch: in the inner corner, with a pencil brush (MAC 219)
- Sleek Boxed and Celebrate: mixed both and applied in the crease with a blending brush (MAC 217)
- Sleek Celebrate: to darken up the crease and outer corner, also applied on the lower lashline with a pencil brush (MAC 219)
- Sleek Noir: used with an angled brush (MAC 266) to line top and bottom lashline softly.
- Urban Decay 24/7 eyeliner in Zero: to line lower waterline.
- False lashes from Claire's, with DUO Lash adhesive.
- Max Factor False Lash Effect mascara: few coats on the top lashes, one coat on bottom lashes.
Some more pictures:
This palette is really nice if you like neutral colours. I like that it has matte and shimmery colours!
Thank you for stopping by!
Up next: one of my favorite blogs for inspiration.
x
Tanja
Saturday, August 13, 2011
Makeover: Magali
Hello!
After I was finished doing Michelle’s makeup, it was Magali’s turn for a makeover!
Here’s the before picture:

And here she is again, after makeup:

Can’t forget the “Excuse-moi” mirror picture :) :

Before and afte pictures together (different pictures than the previous ones):

Did you see that sexy, smoldering look in the second picture? lol
Face:
- Revlon Colorstay for normal/dry skin in 110 Ivory and 180 Sand Beige
- MAC Select Cover-up in NW20
- MAC Blot Powder Pressed in Medium
- MAC Studio Careblend/Pressed in Gold-Go-Lightly (LE: Surf Baby collection)
- MAC Prim &Proper blush (LE: Give Me Liberty of London collection)
- ELF Shimmering Facial Whip in Lilac Petal
Lips:
- She put on a lipgloss she bought in Spain, don’t know what brand it is.
Eyes:

How I achieved this look:
- Urban Decay Primer Potion Original: applied on the lid all the way up to the brow with my finger
- MAC Brun: to fill in my brows, with an angled bush (MAC 268). (I didn’t use anything on her brows)
- MAC Vanilla: as a browbone highlight, applied with a flat shader brush (MAC 239)
- Urban Decay 24/7 Pencil in Perversion: smudges along the upper lashes, blended with a stiff pencil brush (MAC 219)
- MAC Woodwinked: all over the lid, applied with a flat shader brush (MAC 239) and blended up in to the crease with a blending brush (MAC 217).
- MAC Mulch: Applied in the crease and blended out with a blending brush (MAC 217).
- MAC Vainglorious (LE: Venomous Villains collection): smudged along the lower lashline with e pencil brush (MAC 219).
- MAC Ricepaper: In the inner corner, with a pencil brush (MAC 219)
- MAC Carbon: used to softly line the upper lashline, with an angled brush (MAC 268)
- Max Factor False Lash Effect mascara: few coats on the top lashes, one coat on bottom lashes.
- False Lashes from Claire's applied with DUO Lash Adhesive. (Didn’t use lashes on her because I forgot to pack them)
Who wants to be my next model? haha
Hope you liked it and thank you for reading!
Up next: another NOTD (with glitter, yay!)
x
Tanja
After I was finished doing Michelle’s makeup, it was Magali’s turn for a makeover!
Here’s the before picture:
And here she is again, after makeup:
Can’t forget the “Excuse-moi” mirror picture :) :
Before and afte pictures together (different pictures than the previous ones):
Did you see that sexy, smoldering look in the second picture? lol
Face:
- Revlon Colorstay for normal/dry skin in 110 Ivory and 180 Sand Beige
- MAC Select Cover-up in NW20
- MAC Blot Powder Pressed in Medium
- MAC Studio Careblend/Pressed in Gold-Go-Lightly (LE: Surf Baby collection)
- MAC Prim &Proper blush (LE: Give Me Liberty of London collection)
- ELF Shimmering Facial Whip in Lilac Petal
Lips:
- She put on a lipgloss she bought in Spain, don’t know what brand it is.
Eyes:
How I achieved this look:
- Urban Decay Primer Potion Original: applied on the lid all the way up to the brow with my finger
- MAC Brun: to fill in my brows, with an angled bush (MAC 268). (I didn’t use anything on her brows)
- MAC Vanilla: as a browbone highlight, applied with a flat shader brush (MAC 239)
- Urban Decay 24/7 Pencil in Perversion: smudges along the upper lashes, blended with a stiff pencil brush (MAC 219)
- MAC Woodwinked: all over the lid, applied with a flat shader brush (MAC 239) and blended up in to the crease with a blending brush (MAC 217).
- MAC Mulch: Applied in the crease and blended out with a blending brush (MAC 217).
- MAC Vainglorious (LE: Venomous Villains collection): smudged along the lower lashline with e pencil brush (MAC 219).
- MAC Ricepaper: In the inner corner, with a pencil brush (MAC 219)
- MAC Carbon: used to softly line the upper lashline, with an angled brush (MAC 268)
- Max Factor False Lash Effect mascara: few coats on the top lashes, one coat on bottom lashes.
- False Lashes from Claire's applied with DUO Lash Adhesive. (Didn’t use lashes on her because I forgot to pack them)
Who wants to be my next model? haha
Hope you liked it and thank you for reading!
Up next: another NOTD (with glitter, yay!)
x
Tanja
Posted by
Tanja
at
8:40:00 PM
Subscribe to:
Posts (Atom)


